
Made From The Heart
 By: Lakshmi Ganesan & Annabelle Maria Jeffrey
What better way to celebrate Christmas than with presents! Instead of buying presents for your loved ones like always, why not make them? After all, it’s the intention that counts right? Below is a list of fun and creative gift ideas that you can make yourself. What’s more is that you not only get to see your friends and family smile, you might also be able to save some cash making your own presents!
1) GLITTER NAIL POLISH (Difficulty Level 1)

Image & tutorial credits: thecraftedsparrow.com
MATERIALS:
Clear nail polish (new)
Glitter colour of choice (from art store)
Paper
DIRECTIONS:
1) Form a paper funnel that fits into your clear nail polish bottle.
2) Empty about ¼ of the clear nail polish in order to make way for the glitter.
3) Using the paper funnel add desired amount glitter into the nail polish bottle.
4) Stir using the nail polish wand. Close and shake the nail polish bottle.
5) If you wish for the glitter nail polish to be more concentrated, add more glitter to the mix.
2) FLOWER RINGS (Difficulty Level 3)

MATERIALS:
Coloured lightweight fabric of choice/Peach fabric
Ring with a base pad
Three white beads/fake pearls
Lighter
Strong glue
DIRECTIONS:
1) Cut from the fabric 2 circles each of 3cm, 2.8cm, 2.5cm, 2.3cm and 2cm in diameter.
2) Gently move lighter along the edges of the circles in order to singe them. Be careful when doing this.
3) Stack the circles in ascending order.
4) Add glue to the centre of the circles and glue them together in ascending order.
5) Once dry, arrange the three white beads in desired position and glue together.
6) Glue the flower to the base pad of the ring.
3) SUGAR CANDIES (Difficulty Level 2)
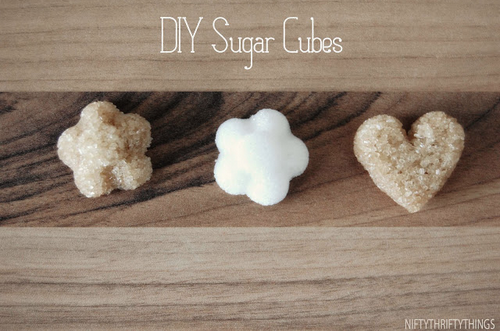
Image & tutorial credits: niftythriftythings.com
MATERIALS:
Bowl
Water
Teaspoon
Ice cube tray/candy mould (heart/star-shaped)
Granulated sugar (white/brown)
DIRECTIONS:
1) Mix some granulated sugar with water in a bowl. Ensure that you don’t pour too much water, in order to make sure that the sugar doesn’t dissolve into the water.
2) Fill the ice cube tray halfway with the mixture. Press the mixture tightly so that it will be in the mould.
3) Leave it to freeze overnight.
4) VINTAGE TIN CANDLES (Difficulty Level 5)

MATERIALS:
Metal tins(make sure it does not have any places of leakages)
Candle wax (can use old candles or an assortment of waxes available at craft stores)
Candle wicks
Double boiler
Wooden chopsticks/skewers
DIRECTIONS:
1) Melt a small amount of wax at the top section of the double boiler. Place the candle wicks in the wax, let the wicks be fully covered with the wax and then remove to let them harden. If your candle wicks are already pre-waxed, then skip to step 2.
2) Clean the tins thoroughly. Add the wicks to the tin base inside the metal tins. Dab a bit of melted wax on the bottom of the wick tin base as it will help to hold it in place. Use either the chopstick or skewer to stretch over the metal tin and wrap the wicks around the chopstick/skewer to hold it in place.
3) Melt the desired amount of wax. As different types of wax have different points, it is important to not overheat the wax as it is flammable. Basic scented candles would be easier and safer to melt down.
4) Once the wax is completely melted, pour it into the vintage tins. The top of the candle should dry smoothly. If not, it means there are air bubbles. Using a wooden skewer to poke down into the candle, when still soft, will release the air.
5) Add melted wax to the top to create a smooth finish
6) Let the wax harden for about 24 hours and then trim off the excess wick to finish it.
5) STUDDED IPHONE CASE (Difficulty level 1)

MATERIALS:
iPhone case
Iron on studs (w/o ‘legs’)
Strong glue/hot glue gun
Ruler
Pencil
DIRECTIONS:
1) Draw a L-shape on the top right hand corner and the bottom left hand corner of the iPhone case. This will be your guide to pasting the studs.
2) Place studs in desired position (refer to picture above)
3) Once satisfied, place a dot of glue on each stud and stick it firmly. Press it in.
4) Allow it to dry for 24 hours.
6) SHARPIE MUGS (Difficulty Level 3)

MATERIALS:
Ceramic mug
Rubbing alcohol
Painter’s tape
Sharpie
DIRECTIONS:
1) Clean the mug with the rubbing alcohol, making sure there is no oil residue on the mug. When the mug is clean, be careful when touching it so as to not leave any residue on it. Use gloves if necessary
2) Use the painter’s tape to make a guide line on the mug
3) Decorate your mug as desired with the sharpie
4) Wait for the marker to fully dry. Once dried place it in the oven and turn it to 232 degrees.This is because the mug needs to be in the oven before it is turn on so that it heats slowly with the oven, preventing the mug from cracking.
5) Set the timer to about 30 minutes or so, and while the mug is in the oven, make sure that to check on the mug so that it does not turn brown.
6) Once the timer is goes off, shut off the oven but leave the mug inside to cool as removing it immediately will cause it to crack
7) Once the oven has cooled, take out the mug and use it.
7) PEPPERMINT SUGAR SCRUB (Difficulty Level 2)

MATERIALS:
Sugar (white/brown)
Unscented oil
Peppermint essential oil
Wide mouth jars
DIRECTIONS:
1) Add the unscented oil to the sugar in about 1/4 increments while stirring the sugar after every time the oil is added.
2) Continue to add the oil to the sugar and stir till the mixture has a consistency that is like of sand that is used for building sandcastles. The mixture should be able to be moulded with your fingers
3) Next, add the peppermint essential oil to the mixture and stir well
4) Scoop the mixture into the jars, pushing the sugar into all the corners well
5) Add another tablespoon of oil into the jar to keep the mixture from drying out
6) Cover the jar with the lid and seal it with a red bow.
8) DUCT TAPE I-PHONE CASE (Difficulty Level 3)

Image & tutorial credits: instructables.com
MATERIALS:
Fabric (For iphone users 8×10 inches)
Patterned duct tape
Stapler
Staples
Scissors
DIRECTIONS:
1) Turn over the fabric, with the patterned side facing away from you.
2) Cut short strips of duct tape around 8 inches, to cover the whole fabric.
3) Turn over the fabric, with the patterned side facing you. Place your phone on the fabric and then measure enough fabric to cover up the phone (approximately around 2.4 inches for iphone 5s users)
4) Staple the sides together to form a pouch.
5) Place duct tape over the staples to cover it. Cut off the excess duct tape.
6) Fold the corners of the material such that it looks like the picture on the left.

7) Press it hardly, so that it maintains that shape.
8) Turn the material inside out.
9) STAINED GLASS HOLDER (Difficulty Level 4)

MATERIALS:
Colourful tissue paper (used in batik drawings)
Matte finished mod podge (can be found in hardware and craft stores)
Paintbrush
Scissors
Glass container for the candle
Craft punches (optional)
DIRECTIONS:
1) Cut out shapes with the craft punches with your desired coloured tissue paper
2) Place a little mod podge in a small plastic container and add a bit of water to thin out the mixture. Make sure it doesn’t become too thin and drippy
3) Apply a light layer of the mod podge on the outside of the glass container and gently place the cut out tissue paper with the paintbrush
4) Once the desired design on the container is completed, gently cover the glass with the mod podge
5) Lay it aside to completely dry
6) Once fully dried, put a candle inside and its ready to be lighted up!
10) BUTTON BOOKMARKS (Difficulty Level 1)

Credits: iheartnaptime.com
MATERIALS:
Colourful paper clips
Fancy buttons
Hot glue
Felt
DIRECTIONS:
1) Hot glue the paper clip to the back of the button
2) Cut out a small piece of felt and glue it to the other side of the paper clip
3) Let it dry before use (you can add glitter to the paperclip to make it more festive)


